Sand Sports - January 1998 - Beautiful Binders
Increase your Volkswagen's stopping power with CB Performance Products' bolt-on, fifty-state "street legal" rear disc brake kit.
BEAUTIFUL
BINDERS
Increase your Volkswagen's stopping power with CB Performance
Products' bolt-on, fifty-state "street legal" rear disc brake
kit
by Jeff Holifield
Contrary to what this article
looks like, it is not about how to install rear disc brakes, or,
at least, that's not what this story is all about. It's about
why you're going to spend hundreds of dollars to upgrade to disc
brakes, when your drums seem to be doing an adequate job. If you
want to know how to install some trick rear disc brakes, check
out the photos on the next three pages. As you can see, you don't
have to be a rocket scientist to install the brake kit from CB
Performance. If you're capable of doing a brake job on a VW's
rear drum brakes, you can install this kit.
I can hear you asking now,
"why do i need disc brakes (particularly rear), and why CB's
kit?" Let's start with the easy one first - why use the rear
disc brake kit from CB Performance, especially when there are
other, less expensive kits? Good question. And here's just as
good of an answer:
A) CB's
kit comes complete, except for new brake handline (which you may
or may not need).
B) CB's
kit is well engineered, using strong, steel hubs and stiff caliper
brackets.
C) CB's
kit uses commonly found, off-the-shelf rotors that are available
at parts houses around the globe. And, most importantly of all...
D) CB's
kit uses brand new, OEM rear calipers with an integral parking
brake mechanism.
We could go on, but why bother.
If "D" didn't cinch it for you, then you're missing
out.
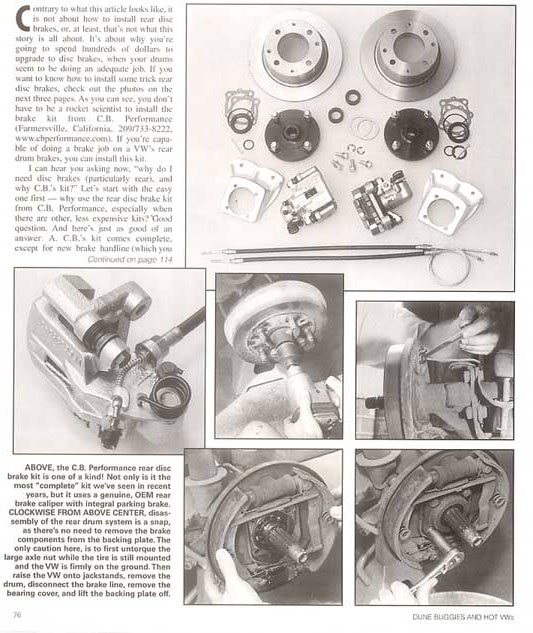
Above, the CB Performance rear disc brake kit is one of a kind!
Not only is it the most "complete" kit we've seen in
recent years, but it uses a genuine, OEM rear brake caliper with
integral parking brake. CLOCKWISE FROM ABOVE CENTER, disassembly
of the rear drum system is a snap, as there's no need to remove
the brake components from the backing plate. The only caution
here, is to first untorque the large axle nut while the tire is
still mounted and the VW is firmly on the ground. Then raise the
VW onto jackstands, remove the drum, disconnect the brake line,
remove the bearing cover, and lift the backing plate off.
|
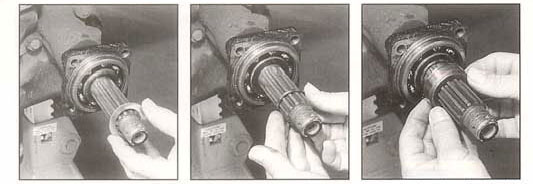
Before going any further, remove the large steel spacer (don't
throw it away), old O-ring, and flat washer from the splined
axle shaft. Also, the large O-ring located around the bearing
O.D. needs to be removed, and the face of the axle tube end
casting (the actual bearing housing) should be cleaned of
all oil and gasket material. ABOVE LEFT, begin by opening
one of the new axle seal kits and install the large, flat
washer against the bearing. CENTER, next the small O-ring
is rolled on until it touches the washer. RIGHT, the bearing's
outer spacer is then installed, with the innner chamfer toward
the bearing, and the outer chamfer facing outward.
|
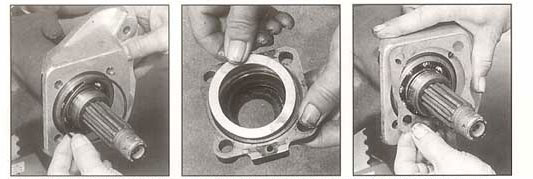
ABOVE LEFT, next to be installed is the large O-ring, followed
by CB's custom caliper bracket. A good deal of time was spent
designing and testing the sturdy, cast aluminum bracket, as
any deflection would diminish the effectiveness of the disc
brakes. Note the thickness, and use of ribs to resist flexing.
CENTER, remove the old seal from the bearing cover, and thoroughly
clean. Reinstall the oil deflector (looks like a large, thin
washer) and the new axle seal that came with the kit. With
the CB axle bearing retainer shim in hand, grease on side
lightly with wheel bearing grease. Place the shim in the bearing
cover, with the greased side resting on top of the axle seal.
RIGHT, holding the caliper mount in place, add the paper gasket
to the face.
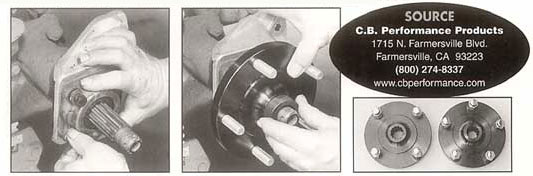
ABOVE LEFT, still holding the caliper mount, replace the bearing
cover and snug the 10mm bolts. A word to the wise here: over
the years, VW used two different grades of bolts to secure
the bearing cover in place. Specification 10K bolts, which
are torqued to 43 ft-lbs., and specification 8G bolts, that
can take only 31 ft.-lbs. of torque. Obviously, spec. 10K
is the strongest. If your bolts are 8G, we highly recommend
switching them to spec. 10K bolts, as these fasteners take
a majority of the braking forces. CENTER, next the hub is
slid on (along with a spacer on some installations). The axle
nut is then installed, but only hand tight at this time. RIGHT,
CB offers two different bolt patterns - VW 4 lug, and Porsche
5 lug. Some other patterns are available by special order.
|
|